
Whether it's writing letters, designing invitations, or laying out smaller brochures: Microsoft Word is the program of choice for many. According to a study on the use of Office software, Microsoft Office – and thus Microsoft Word – has a market share of 85 percent in German companies. So there are many who use Word professionally. In any case, hardly anyone can avoid Microsoft Word, the market leader. That's why we've taken a closer look at parts of the program and provide 11 tips for Microsoft Word below: For beginners, advanced users, and experts.
4 Tips for Microsoft Word – for Beginners
We start with tips for Microsoft Word for beginners and novices.
Tip 1: Important Keyboard Shortcuts
A few important keyboard shortcuts that will make working and writing with Word easier are:
- Ctrl + A: Select All.
- Ctrl + C: Copy. You copy everything you have selected.
- Ctrl + V: Paste. You paste what you previously copied at the selected location.
- Ctrl + S: Save. You save your current document. When saving for the first time, you also choose the save location.
- Ctrl + Z: Undo. The last action you performed is undone. If you press the shortcut again, the action before that is undone, and so on.
Already know these shortcuts? Here are a few more, especially for writing texts:
- Ctrl + Shift + F: The part you have selected will be highlighted in bold.
- Ctrl + Shift + W: The part you have selected will be highlighted and underlined.
- Ctrl + F: Opens the search window, with which you can search for and find specific words or character/letter combinations (e.g., in a longer text).
- Ctrl + Arrow keys: You navigate through the text faster, word by word. An important shortcut for anyone who writes a lot and wants to navigate quickly in the text without using the mouse.
Tip 2: Easy Work with Tables

You insert a table into your Word document via "Insert," "Insert Table." Here you see a matrix and can easily determine the number of rows and columns. So far, so familiar. Here are a few additional tips.
- Does your table have too few rows? Click in the last cell and add as many additional rows as you like by simply pressing the "Tab" key. It's quick and easy.
- Select the entire table and you can, for example, show or hide all borders. The table is still there, you just don't see it anymore, and you can arrange texts in cells, rows, and columns clearly. A practical application example can be found in Tip 8.
- Select the top row (or any other row/column/cell) and you can assign a specific color to it using "Shading."
- Have you pulled too much on the row and column edges and the table is inconsistent? Simply select the table, right-click, and choose "Distribute Rows Evenly" or "Distribute Columns Evenly." And everything will be arranged uniformly.
Tip 3: Inserting Images in the Right Place
There are two ways to insert images:
- Drag & Drop
- The "Insert" menu item, "Insert Pictures" - and here you choose the source.
With Drag & Drop, you need to pay attention to where your cursor is at that moment. Often, an image is dragged to a location where the cursor is not located at all. It then appears "somewhere in the document" but not where you expect it. When inserting via the menu, the cursor's location also matters. Here, however, this is somewhat logical.
Once the image is inserted, it has a fixed place. But you can move it arbitrarily and choose from many text wrapping formats. Whether freestanding in its own line, in front of, behind, or next to the text... there are many possibilities. You can further edit the image using the "Picture Format" tab (which only appears when you click on an image) and "Crop."
Tip 4: Applying a Format
When you copy information from different sources into a Word document, you can quickly recognize it by the format. Then each paragraph has different fonts, font sizes, line breaks, indents, line spacing, and much more. The format is inconsistent.
If you want to quickly adapt paragraphs to an existing format, the "Format Painter" function can help, among other things. First, you select the part (e.g., paragraph, sentence) whose format is correct, and then you have the option to transfer another part (e.g., paragraph, sentence) to this format. This works once, then you have to activate "Format Painter" again.
Unless you use this expert trick: Format Painter is then activated with a double-click. Now you can use the "brush" that appears with this command as often as you like to adapt formats. The function remains active until you deactivate it with another click – or do something else, like simply continue writing your text.
4 Tips for Microsoft Word – for Advanced Users
Do all the tips up to this point sound familiar to you? Maybe there's something for you in the following four suggestions. But beginners should definitely keep reading too.
Tip 5: Do everything with the keyboard by simply pressing the Alt key

The fastest and most effective way to work is to avoid using the mouse as much as possible. But how do you navigate the Word menu using the keyboard and execute commands for which there isn't even a shortcut?
Simply pressing the Alt key helps here. A letter or a sequence of letters then appears behind each menu item. Simply type this letter with the keyboard and you can, for example, insert a table with any number of columns and rows using "I", "LA" and the "arrows" – completely without using the mouse. With a little practice, you will need the mouse less and less and work faster and faster.
Tip 6: Additional Keyboard Shortcuts
Other important keyboard shortcuts that help you work in Microsoft Word are:
- Ctrl + X: Cut. The selected part is removed and can be reinserted elsewhere using Ctrl + V.
- Ctrl + Shift + Arrow keys: This allows you to select an entire word with one keystroke and then select more words or paragraphs with each additional press of an arrow key. This way, you select specific parts of text much faster than with the mouse.
- Ctrl + P: Print. You go directly to the Print menu without any detours.
- Ctrl + 8: The selected part is reduced by one font size point.
- Ctrl + 9: The selected part is increased by one font size point.
- And my favorite shortcut: Ctrl + Y: This repeats a previous action, if possible. Used correctly, this shortcut saves you a lot of time. An example: Within a longer table, you need to shade certain cells with color. You do the first cell "the long way," meaning you select a cell and use the "Shading" and "Choose Color" commands. For all other cells, you can now skip the clicking and use the shortcut Ctrl + Y.
Tip 7: Track Changes
This function is popular with anyone who writes texts or proofreads texts. You can find the command under "Review," "Tracking," "Track Changes" (or via the Alt key with the letters P, DN, G).
Everything that is changed by you in the Word document from then on is highlighted (added and underlined or struck through in a different color) and thus remains traceable for everyone. This way, you can proofread a text and send improvements back to the author as a suggestion. The author, in turn, can also quickly jump through the entire document from the "Review" level – from suggestion to suggestion – and review the entire document and accept or reject the correction suggestions with one click via "Accept Change and Move to Next" or "Reject Change and Move to Next."

Tip 8: Using Special Characters in Microsoft Word
With special characters, interesting things can be achieved in Word. You can find them via "Insert," "Symbol," "More Symbols" or via the keyboard using Alt, I, SY, W. In addition to characters from other languages like Greek, Cyrillic, Hebrew, Arabic, etc., you also have geometric shapes, for example.
One of my most frequently used symbols – for which I even created my own shortcut – is a simple square "□". Why? Because I often use it to create checkboxes, e.g., for questionnaires. If you combine Tip 2 with Tip 8, this is super easy in Word and requires no layout.
Step 1: Create a table with, for example, several rows and columns, write the corresponding text, and adjust the table so that it looks good.

Step 2: Now the special character "Square" comes into play. Select the special character, enlarge it with Ctrl + 9, and insert and center it everywhere in the table.

Step 3: If necessary, hide the entire table border.

3 Tips for Microsoft Word – for Professionals
You knew that? Then we have selected a few functions in the following that might be new to you. Even though these tips are aimed at experts, we will describe them in such a way that even beginners can try them out.
Tip 9: Custom Keyboard Shortcuts
Are there no keyboard shortcuts in Word that you don't know? Then simply define your own keyboard shortcut. In the following example, we create a keyboard shortcut for inserting tables. Because there isn't one.
You create your own keyboard shortcuts using the "Customize Keyboard" field. Depending on the Word version, the paths here are slightly different. In newer versions, the path is "File," "Options," "Customize Ribbon," "Customize." In the "Customize Keyboard" menu, you first select the tab where the command is hidden – in our example, "Insert." And in the Commands field, select "Insert Table." You then assign a keyboard shortcut to this command.

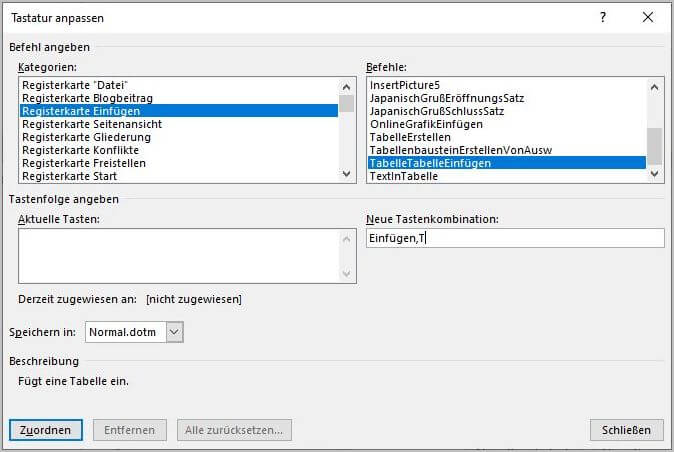
In this example, I first choose the "Ins" key (the "0" from the numeric keypad) and the T. This combination makes sense in my opinion, as it doesn't overwrite an existing keyboard shortcut. Since many things are already assigned via Ctrl and Alt, almost everything is open to me with Ins as the first key.
Of course, you can also start the commands classically with "Alt" or "Ctrl." However, you are somewhat more restricted, as many things already exist, and possible new shortcuts will be longer. If you choose an existing shortcut, it will be displayed. You can then decide whether you want to overwrite the existing one or switch to a different combination.
Finally, you can choose whether your shortcut should only apply to the current document or to all your Word documents. If the latter is the case, leave "Normal.dotm" selected and click "Assign." Now you have created an individual shortcut that only you know.
And another note: Always enter the shortcut completely, not key by key. The latter does not work.
Tip 10: Displaying All Shortcuts – Including Your Own – in a List
Have you created shortcuts with the help of Tip 9 and lost track? Or do you want to know which shortcuts Microsoft has already set up for Word? Then use this tip to read out all the shortcuts that exist. And this is how it works:
- Go to "View," "Macros," "View Macros."
- Here in the dropdown menu, select "Word Commands" for macros.
- In this list, select "List Commands" and follow the dialog.


The result is a ten-page table with all Word shortcuts. Your own commands – such as the new shortcut for inserting tables – are also in the list. Even experts will surely find something new here.

Tip 11: Customizing the Ribbon
You have probably already noticed that tables in Word are an important function for me. We have already created a shortcut for this in Tip 9. But there is another way to make these, as well as other commands and functions, more accessible; namely, via the Ribbon. Unedited, it looks like this on the "Insert" tab:

But that's about to change.
For example, inserting or drawing tables requires several clicks. Creating a text box also takes several clicks. To edit and replace images, you would have to switch tabs and execute the command elsewhere. However, these are all commands that I use very frequently and would like to access more quickly and compactly. All in one place, so to speak. And that's exactly what can be set up in the ribbon.
Here's how:
- You are already familiar with the path via "File", "Options", "Customize Ribbon".
- In the left column of the ribbon, we go to "All Commands", and on the right, the "Main Tabs" remain.
- We choose a place where the new section should be inserted into the ribbon. "Home" would probably be optimal, but for this example, I'll just put it next to "Table" under "Insert".

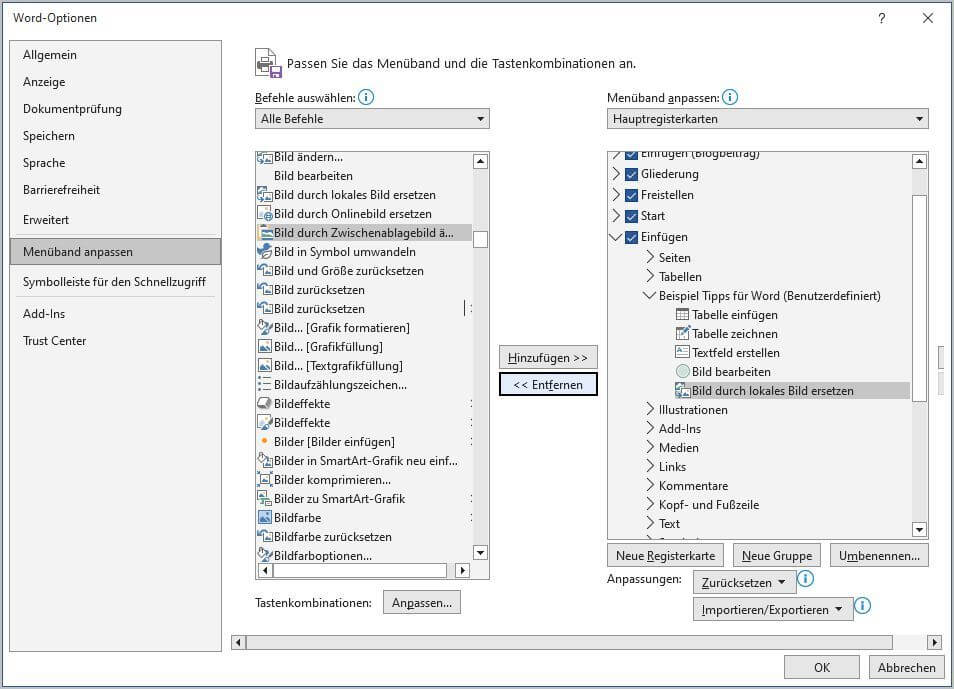
- You create a "New Group", give it a name, and then select all the commands you want in your individual group from the list on the left. In this example, I have chosen five commands.
- Once everything is added, click "OK" and your individual group of commands will be in the ribbon.

More information and tips on Microsoft Word, Excel, PowerPoint and co.
 Of course, there would be much more to say about Microsoft Word at this point. For example, we haven't touched on the "References" or "Mailings" tabs. Here you can, among other things, create tables of contents where the corresponding page numbers automatically align with the page numbers of the headings. Or you can use address lists in Excel to create mail merges and/or design and print address labels. So, plenty of material for 11 more tips on Microsoft Word and other Office programs.
If you want to learn more and systematically work through Microsoft Word as well as other Office programs like Excel, PowerPoint, Outlook, OneNote and co., we recommend the book Office 2019 See and Do - Picture by Picture.
And another tip: Subscribe to our newsletter. Because from time to time we get many of these helpful tools around Word and Microsoft Office for a limited period at very favorable conditions.


