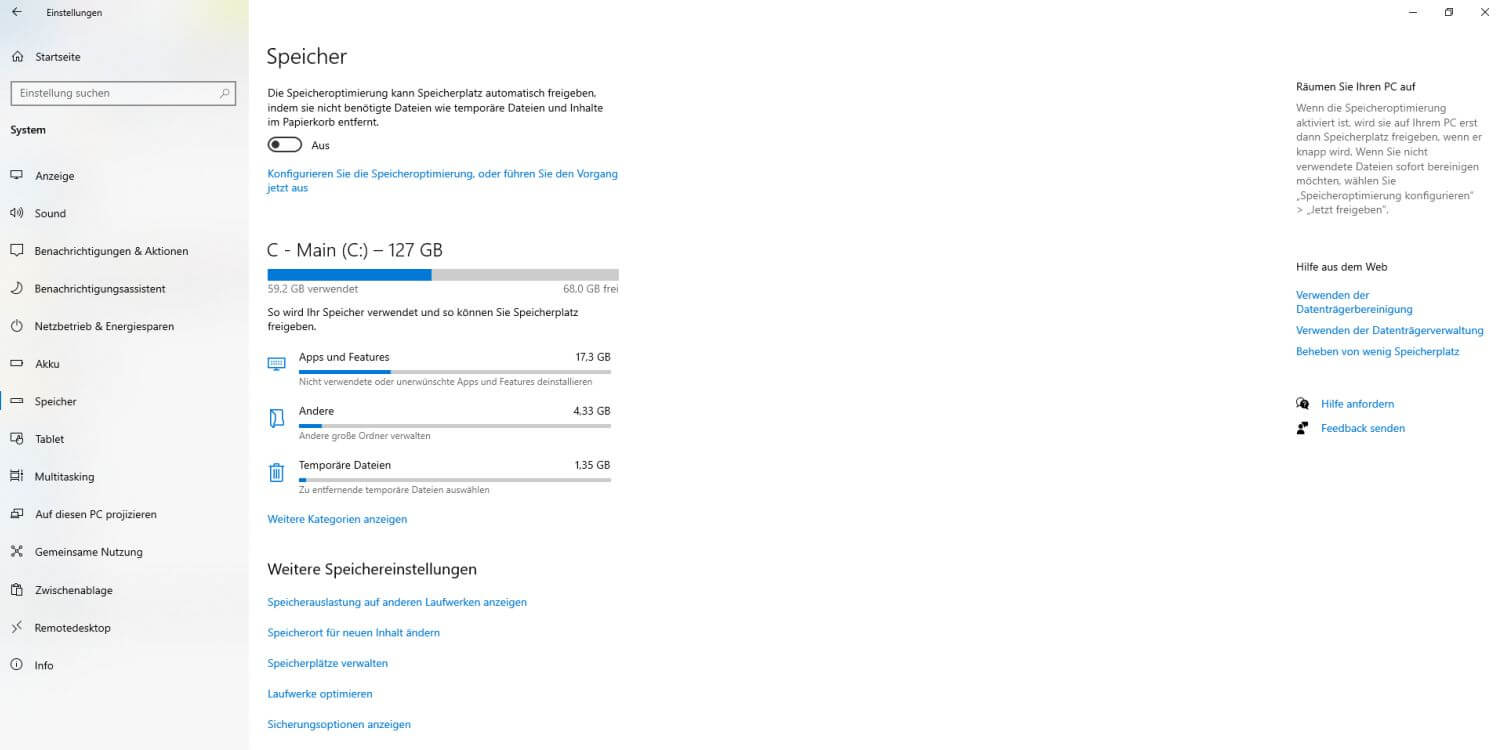
Have you noticed that your free storage space significantly decreases after a Windows 10 or Windows 11 update? This is because Windows keeps old installations for an extended period – even if the update works flawlessly. So after an update, you have both on your PC: the old installation and the new one. The idea behind this: Windows wants to make it as easy as possible for you to return to the previous state, because you never know…
Don’t want this? Then in today’s tip, we’ll show you how to reclaim this storage space yourself and delete old installations. If the update has worked smoothly and you don’t plan to revert, you can safely free up this storage space.
Windows 10 and Windows 11 Storage Usage
Since the Spring 2018 Update, Windows offers a very clear storage usage overview. Here you can see how many GB are occupied by:
- Your System
- Apps and Games
- Temporary Files
- OneDrive
- Desktop
- Maps
- Documents
- Pictures
- Music
- Videos
To open the storage usage, proceed as follows:
- Press the key combination Windows + I
- Click on System and then on Storage
- Now click on the “This PC” button and Windows will show you what’s occupying your storage on this PC. This scan may take a moment.
Reclaim Storage Space
In the storage usage, click on “Temporary Files”. Here, Windows lists all files that you can safely delete – including previous Windows installations.
If present, these “previous Windows installation(s)” usually occupy a very high two-digit number of GB. You can now reclaim this storage space with just a few clicks.
Of course, from the Windows storage usage, you can also view the storage requirements of your other files and programs and thus specifically find and delete (or move to an external hard drive) storage hogs (e.g., very large videos). This way, in addition to removing previous Windows installations, you can manually reclaim a lot more storage space.
Delete Even More Unnecessary Data and Reclaim Storage Space on Windows
If you want to remove additional data junk from your system in addition to “previous Windows installations”, we recommend the tuning tool TuneUp Utilities. Here you can delete data junk from over 200 programs with just a few clicks. Anyone interested in this software can purchase a 2-year version of the tuner for €29.99 (instead of €69.98) via this link.
Here are the steps listed in detail again:
1. Use Disk Cleanup
The classic method to free up storage space:
- Open the Start menu and type “Disk Cleanup”.
- Select the drive where Windows is installed (usually C:).
- Click on “Clean up system files”.
- Check the box next to “Previous Windows installation(s)” and other unnecessary files.
- Confirm with “OK” and start the cleanup.
This method can free up several gigabytes of storage space.
2. Activate Storage Sense
Windows 10 and 11 offer the “Storage Sense” feature, which automatically removes unnecessary files:
- Go to “Settings” > “System” > “Storage”.
- Activate Storage Sense.
- Click on “Configure Storage Sense or run it now”.
- Specify which files should be deleted (e.g., temporary files, Recycle Bin contents).
With this feature, your system stays automatically lean and performant.
3. Manually Delete Temporary Files
In addition to the methods mentioned above, you can also manually remove temporary files:
- Open “Settings” and navigate to “System” > “Storage”.
- Click on “Temporary files”.
- Select the file types you want to delete (e.g., temporary internet files, thumbnails).
- Click on “Remove files”.
These steps help to free up additional storage space and improve system performance.

